So, you've just received your TiVo! So what now?
You're probably wondering what to do next and this page will help you out.
We remember what it was like when we got our first TiVo, way back in April 2001! You'll be itching to get stuck in and get it up and running, but don't rush, take a few minutes to read these brief instructions, they may just save you some time in the end!
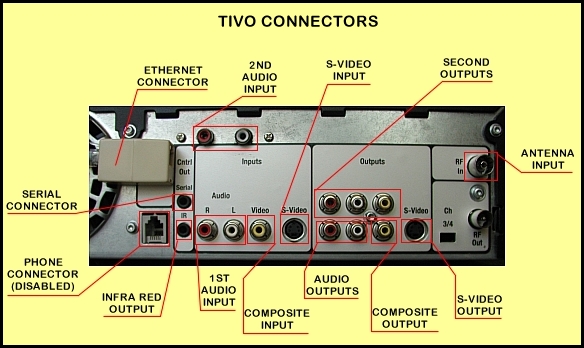
Firstly, when you receive your TiVo from us it will be configured to receive Free To Air channels via the builtin Tuner. The first thing you should do is hook up the TiVo to your antenna and TV and check that it all works. Here's a shot of the TiVo connectors which should help.

Connect the TiVo to your TV using either the supplied Composite AV cable or an S-Video cable supplied by you. Referring to the picture above the connections should be made to the Audio Outputs Connectors, and one of either the Composite Output or the S-Video Output connectors.
Connect the TiVo to your network, plug a cable from your router or integrated modem/router unit into the ethernet connector (see illustration) at the rear of the TiVo. Or, if you are using a wireless bridge (not supplied) to connect it to a wireless network then plug in that instead.
Connect the cables from the sources you intend to use, this will probably be an antenna cable (plug it into the Antenna Input connector) and possibly a Set Top Box (STB) of some kind, either PayTV or Digital Free To Air. If using an STB connect to it to the 1st Audio input connectors, and one of either the Composite input or S-Video input connectors, depending on which type of connection your STB has available.
If you are using an STB plug the supplied Infra Red "blaster" cable into the socket labelled Infra Red output in the illustration and position the blaster's head in front of the Infra Red receiver of the STB you wish the TiVo to control.
Turn everything on!
You should see the TiVo's boot sequence begin, first you will see TiVo's initial boot screen for a few seconds, at this point the TiVo is still in the American NTSC format and if your TV cannot automatically switch into NTSC mode it may be distorted or the picture may "roll" but don't worry, in a few seconds the TiVo will switch into PAL mode and things will stabilise.
Next you should see the ozTiVo Welcome screen, just let the process continue for about 1 minute until the start-up animation commences. The sound during the start-up animation will be distorted as it was recorded in NTSC mode, but we're now in PAL, so press the "TiVo" button on the remote control to kill it (or put up with the distorted sound if you want to watch the animation) and the next thing you'll see is TiVo's main menu, called "TiVo Central".
From TiVo Central select the Menu option "watch live TV" and use the channel up/down buttons on the remote control to try a few channels, hopefully you'll see some channels displayed, but possibly not all that the TiVo will try to tune to, it knows all the channels you might receive but you probably won't get all of them!
Play with Live TV for a couple of minutes, try pausing and rewinding, it's great fun!
Next select the menu option titled "Messages & Setup", then "TiVo Messages". You should see a message titled "IP Addresses". If you don't then you haven't waited long enough, so press the TiVo button to return to TiVo Central, and don't be so impatient! (Note that wherever you are in TiVo's menu structure the TiVo button always takes you back to TiVo Central, remember that, it's worth knowing)
When you eventually get the "IP Addresses" message select it and read it! Then note the IP and MAC addresses it tells you. We might need these later if Hobotech needs to help you out with a problem! And we'll certainly need to use them if you need to run Guided Setup to reconfigure your TiVo for alternate or additional inputs.
What we do next depends if free to air on antenna is all you need, if that's true and it's working okay we're done, so have fun with your new TiVo and let us know immediately if you strike problems. If on the other hand, you've got more things to hook up, or something's not working, it's time to re-do Guided Setup. Please click here for a detailed walkthrough of the Guided Setup process!
Thank you again for selecting us as your TiVo supplier!
© Hobotech Pty Ltd 2005,2006